
You have read my long rant here, have examined your motivations, and are determined to actually sew the kimono? Well let’s go then.
First off, I want to once again specify we are going to work on an unlined kimono, or 単衣/hitoe. I think cutting is the most interesting part, as it is a zero waste process, at least if using a kimono bolt, so I want to dedicate this part to determining one’s measurements, translating them to the kimono form, and cutting the bolt. These bolts are between 36 to 40 cm in width, but nothing stops you from using a western fabric: the trick is to just follow the measurements and widths I will explain later.
Before we start, I want to add that, due to the width of the kimono bolt, sizing is very limited (up to 98~100 cm hip), especially when dealing with smaller vintage bolts. There are some kimono artisans specialized in larger sizes but I am not knowledgable enough on the topic to offer precise resources so I’ll educate myself further before tackling this particular topic. I’m thinking that rather than using a kimono bolt, western fashion fabrics could do the trick but as I said I need to try for myself and ask experts on this.
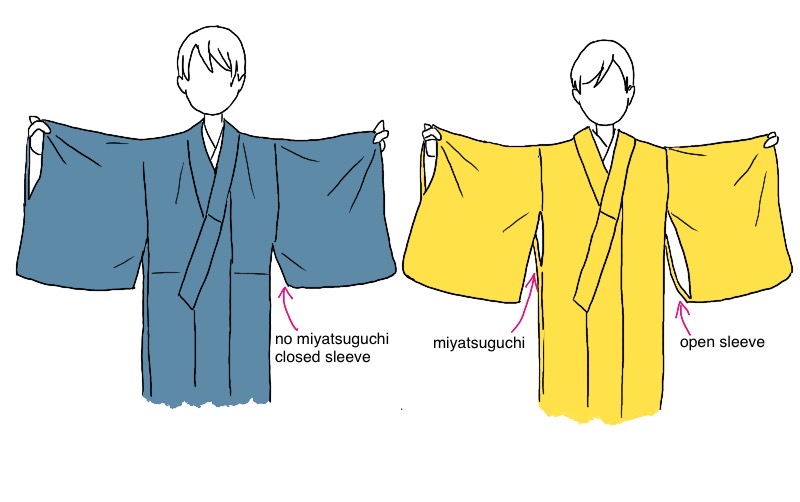
Another very important caveat before we start: if you browse kimono websites in Japanese or other languages, you will be quick to notice there are a few minor differences in constructions between “men’s” and “women’s ” (in quotes because gender is just a convention) kimono. I feel quite sick when I use such gendered terminology so instead I will be calling “women’s” kimono “kimono with miyatsuguchi” (a side slit I will explain later), and “men’s kimono” “kimono with no miyatsuguchi“.
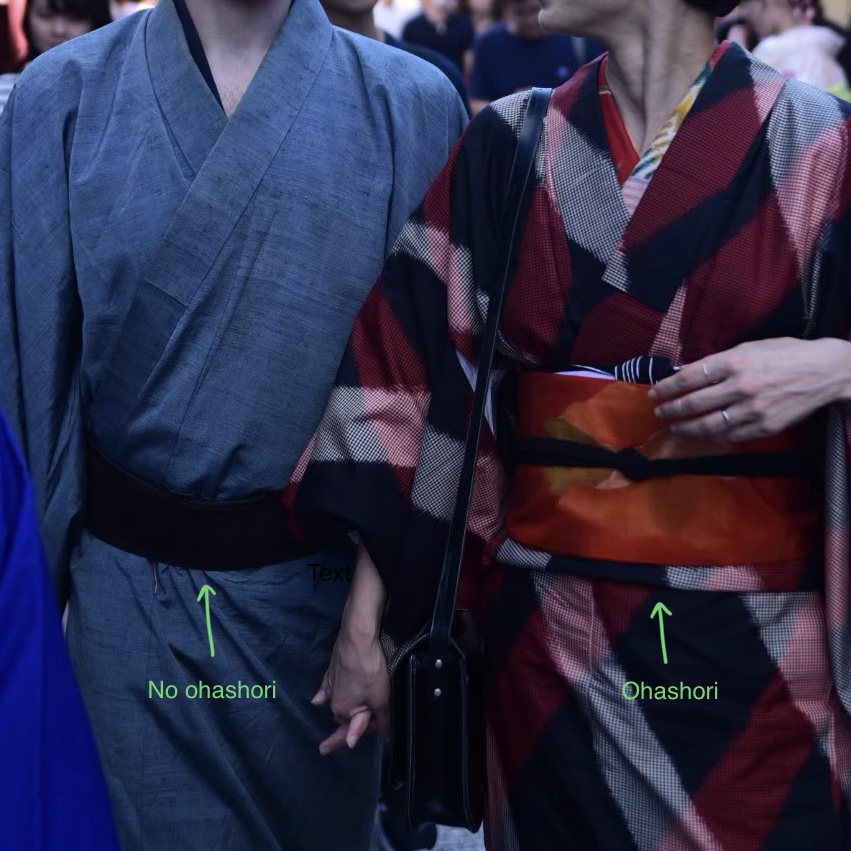
Another evident difference is the おはしょり/ohashori, a tuck underneath the obi, kimono with miyatsuguchi often feature. I decided not to use this as a discriminating factor because it is just a question of length choice and not a fundamental construction difference: if you wear vintage kimono, you’ll probably wear it with no ohashori anyhow due to the kimono being very short in the first place.

After this long introduction, let’s grab our tape measurements and begin!
1. Measure yourself
You will need three measurements;
- 身丈/Mitake (height). Typically, the length of a kimono with miyatsuguchi is as long as they are tall, since it it generally worn with the ohashori. Kimono with no miyatsuguchi, on the other hand, are worn with no tuck and therefore are as long as the distance from the shoulders to the ankles.
- Hip circumference
- ゆき丈/Yuki take (sleeve length). The yuki is basically the distance between the center of your back and your wrist, or where you want your sleeve to end, as illustrated in the picture below.

2. Determine the width of front and back pieces
Every piece of the kimono has its own name. In this guide I will refer to their Japanese names and, when needed, provide a translation for clarity. After taking measurements please familiarize yourself with these terms and the location of the pieces by using the handy graph shown below.

Before we move on, I want to finally clarify what this miyatsuguchi is. In the picture below, the right is of a kimono with miyatsuguchi, which you can tell because there’s a slit in the side called 身八つ口/miyatsuguchi. In kimono with no miyatsuguchi (on the left) there is no slit. That’s it. That’s the tweet. As a consequence of the miyatsuguchi, the 袖付け/sodetsuke, basically the length of sleeve which is attached to the body, also differs: it is much shorter in kimono with miyatsuguchi to allow for a tall obi worn high on the back, so please do consider which type of obi you will likely wear when constructing your kimono. Personally, I go for kimono with miyatsuguchi because that allows me maximal versatility as I either own very short kimono (so no ohashori) or can hide the ohashori in the low obi for the kimono with no miyatsuguchi look, but I also really like high and complex knots.
Once you have determined your hip circumference, you can calculate the first measurements: the width of the front and back piece, and the okumi width. Exciting stuff. Here is a small cheat sheet you can use as a reference, without added seam allowances (SA from now on). This cheat sheet only works with kimono bolt widths and, as I mentioned prior, sizing is very limited.
| Hip measurement | Back piece width | Front piece width | Okumi width |
| < 87 | 27.5 | 22 | 15 |
| 88 ~ 92 | 28.5 | 23 | 15 |
| 93 ~ 95 | 29.5 | 24 | 16 |
| 95 ~ 100 | 30.5 | 25 | 16 |
3. Determine the other measurements
It’s now time to determine a whole lot of new measurements based on the ones above, your own body type, and preferred proportions. Here, I’m recapitulating some of them in a range based on vary basic averages from wasai books and my own notes, without SA. Do absolutely keep in mind that some, such as the mitake and the yuki take, will depend on your height and wingspan, whereas others will depend on your own personal taste. You will not need all of these measurements to cut your fabric (actually you only need the mitake and the sode yuki!), but they are essential when it comes to construction so make sure you calculate them before you start sewing.
| Name | Range (no SA) | Notes |
| Sode take (sleeve length) | 49~53 | Can be changed according to preference |
| Sode guchi (sleeve opening) | 21~28 | |
| Sode tsuke | 21~23 or 40-43 | Second range if no miyatsuguchi |
| Sode haba (sleeve width) | 32~36 | Yuki – kata haba |
| Mitake (length) | Depends on your height | |
| Miyatsuguchi | 13 | Not in kimono with no miyatsuguchi |
| Yuki (center back to cuff length) | 62.5~68.5 | Depends on your wingspan |
| Kata haba | 30.5~32.5 | Yuki – sode haba |
| Ushiro haba (back piece width) | Depends on your hip, see above | |
| Mae haba (front piece width) | Depends on your hip, see above | |
| Okumi haba | 15~16 | |
| Eri shita | 68~80 | Mitake × ½ |
| Eri haba (collar width) | top 5.5, bottom 7.5 | Top is CB, bottom is bottom edge of collar |
How much fabric?
As with any sewing project, the question of yardage always comes up. If you are using a kimono bolt, expect to use most of it. There are various ways to utilize the various numbers we got out in the steps above and arrange them on the fabric, the following being IMHO the simplest.
Consider your fabric (yes, all of it) as a rectangle like below. Now look at the parts marked a, b , and c in the figure and take your own measurement above.

a = body piece = mitake + 2 cm (SA)
b = sleeve piece = sode take + 4 cm (SA)
c = okumi piece = a – 19 cm
So,
Yardage = 4a + 4b + 2c
For example, I am 170 tall but due to fabric constrains made the kimono at the top of this post with a mitake of 155 cm. I like my sleeves on the longer side, so my Sode take was 50 cm. Using the formula above, a = 157 (155+2), b = 54 (50+4), and c = 138 (157-19). Therefore, (4×157)+(4×54)+(2×138)= 11 m 20 cm. Voila!
4. How do I cut this thing now
Now comes the fun part, cutting the bolt. There are a few ways to do so, and this is actually not the way I personally use but it’s the easiest to explain so here we go:
- start by unraveling part of your bolt to the length of b, leaving some extra fabric at the end. Fold another length of b on top of the first length (not counting the little excess you have left! Pretend that doesn’t exist). Repeat the process another time so you have b×4.
- At this point, after the forth b, fold the fabric and keep unraveling to the length of a. Fold another length of a so to have a×2. Repeat the process to have a×4.
- Fold the length of c. you should have 19 cm of difference between a and c, plus leftover fabric at the end of the bolt, if any.
- Cut at the cut points indicated below.

You now have all your pieces, meaning 2 body pieces, 2 Sode (sleeves), and a large section which you will then cut into okumi and eri (collar) pieces. I didn’t mention it prior, but the eri piece includes both the eri proper and what’s called the kake-eri, which is sewn on top of the eri proper. For now let’s just focus on separating the okumi from the eri in this way:
- you know your okumi width measurement from the first table I showed (15~16 cm). Keep this measurement in mind for when you’ll sew the okumi on, as it’s not useful for cutting
- to avoid waste, consider the following: the bolt width is = (2×x)+2 cm.
- Look at the diagram below: the okumi is equal to x+2 cm, and the eri is equal to x. Therefore, x = (bolt width-2 cm)/2.
- Okumi width is equal to x+2 cm. Mark it and cut it. Check that the eri width is equal to x. You will separate eri and kake eri later, for now take the okumi piece and cut it in half so you have 2 equal okumi pieces

Now you have basically all the pieces needed to sew an unlined kimono and/or a yukata, good job! Please keep in mind this is just the barest of the minimum, and we still need to tackle more measurement, marking, and sewing order.
BONUS – How to cut a western fashion fabric
I was ready to hit publish and I realized it may be useful to add a short intro on how to cut a western fabric the kimono way. This is particularly useful when your size exceed what allocated for in a traditional kimono bolt.
Keep in mind that the yardage calculation is different in this case, and uses the below formula:
Yardage = 2a + 2b
This is because a is the mitake + 2 cm of SA, b is the sode take + 4 cm of SA, and c is the okumi (same old a – 19 cm), but given the different arrangement of the pieces you end up with a different distribution and yardage. The more you know! Below is a simple graph on how to cut the western fashion fabric. I haven’t explained the slit for collar (eri kata aki) yet as this is part of the marking process so ignore it for the time being.

This is all for now!
Happy sewing.

[…] is part II of an ongoing series on wasai. Look here for part I, which deals with measuring yourself and cutting your pieces, and here for the […]
LikeLike
[…] is part III of an ongoing series on wasai. Look here for part I, which deals with measuring yourself and cutting your pieces, here for part II to learn […]
LikeLike